

Fortinet Firewalls support the use of address objects in static routes. This includes individual address objects, address groups and FQDN address objects.
This feature is particularly useful if you have numerous VPN connections or if you reach the maximum number of configurable static routes on the gateway. For example, lower-end models like the 60E support up to 100 routes in the configuration. To view the maximum values, use the print tablesize command or refer to the Fortinet max value table.
These objects need to have the “allow-routing” property enabled by using the property: set allow-routing enable.
- Background
- How to minimize the work load?
- The Setup
- Static routes
- Object Naming
- Fortigate
- FortiManager
- Conclusion
- Links
Background
You may ask why still use static routes in 2024? Fair question.
There are a few things to consider, such as managing third-party connections (e.g., with other service providers), the complexity of routing protocol setups and the size of the environment.
Routing Protocols typically require to have some sort of addressing on the interface.
This might work with some small scale VPN setups, but this is getting an enormous task with full mesh VPNs, in particular when the Full Mesh configuration is done by a Management System like FortiManager and the resulting configuration are single VPN Tunnels between each Firewall.
Some Math for the number of tunnels
You can calculate the number of tunnels created with the formula:
Number of tunnels=2n×(n−1)
where n is the number of firewalls in the full mesh network.
So, with 5 nodes, you will have 10 tunnels:
5 x 4 = 20
20/2} = 10
With 10 nodes, you will have 45 tunnels:
10 x 9 = 90
90/2 = 45
With 30 nodes, you will have 435 tunnels:
30x 29 = 870
870/2} = 435
This leads to a significant challenge in managing IP addresses, not to mention configuring them within management systems. For instance, FortiManager doesn’t offer access to interfaces or routing tables via the API, further complicating the process.
Indeed, managing such a vast number of tunnels manually or even through management systems can quickly become impractical.
Are there Options? You may ask.
Yes, indeed, there are alternatives. Cisco introduced DMVPN, which features only one tunnel on each node and shares a common subnet with all nodes. However, this appears to be a Cisco only approach.
Next you may think BGP might be a solution. So using loopback interfaces to peer the nodes. but still this requires to assign an IP address to the loopback interfaces and configure the peers on each node and route the loopback addresses over the tunnels.
Since we are still configuring each node and deploying static routes on each node.
Why then do dynamic routing at all?
We decided to go with static routing only. This has on the positive side that this setup is vendor independent and simple.
How to minimize the work load?
Utilize the FortiManager for the Full Mesh configuration and the routing setup.
In the first place there needs to be static routes to the Local Network.
Secondly the traffic needs to be routed over the VPN in the other Sites.
At this point it comes in handy that the VPN Manager and static routing can use Objects in the configuration.
Let us continue with the Setup.
The Setup
The setup divides the firewall and VPN functionality into multiple VDOMs. Mostly for history reasons.

Static routes
There will be three classes of static routes, eg. Site, Sites and CPE/WAN.
Site Routes
Those are routes to the local site. In this case 192.0.2.0/24.
Routes to All other Sites
Those are all Sites. With the usual static route this would exclude the Local Site.
When utilizing Objects and Groups, the Group will include the Local Site, this requires to assign different distances for Local and Remote routes.
CPE/WAN
Those are routes to the CPE or WAN Subnets, those are the outside networks to connect the VPN Tunnels.
Administrative Distances
We will assign AD based on this Table.
| Distance | Description |
|---|---|
| 5 | Routes to Site, Named |
| 6 | Routes to Site, IP / Subnet |
| 10 | Routes Create by Hand / VPN Manager |
| 15 | Routes to Sites over VPN, Named |
| 16 | Routes to Sites over VPN, IP / Subnet |
Object Naming
We will use different Objects for Routing and in the Policy Package.
Prefix: ROUTE
Type: G = Group / N = Network
Kind: SITE / CPE
Name: Networks will be written with 2 dashes and the bitmask, eg. 192.0.2.0–24
Sitegroups will be named as SITE-Networks-<LOCATION ID>
Fortigate
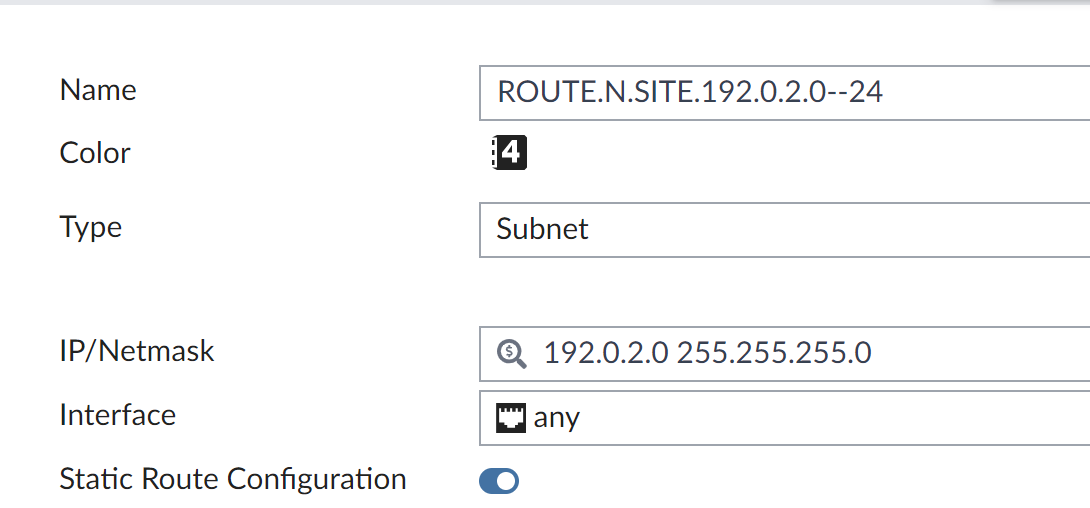
Address Objects
# show firewall address ROUTE.N.SITE.192.0.2.0--24
config firewall address
    edit "ROUTE.N.SITE.192.0.2.0--24"
        set allow-routing enable
        set subnet 192.0.2.0 255.255.255.0
    next
end
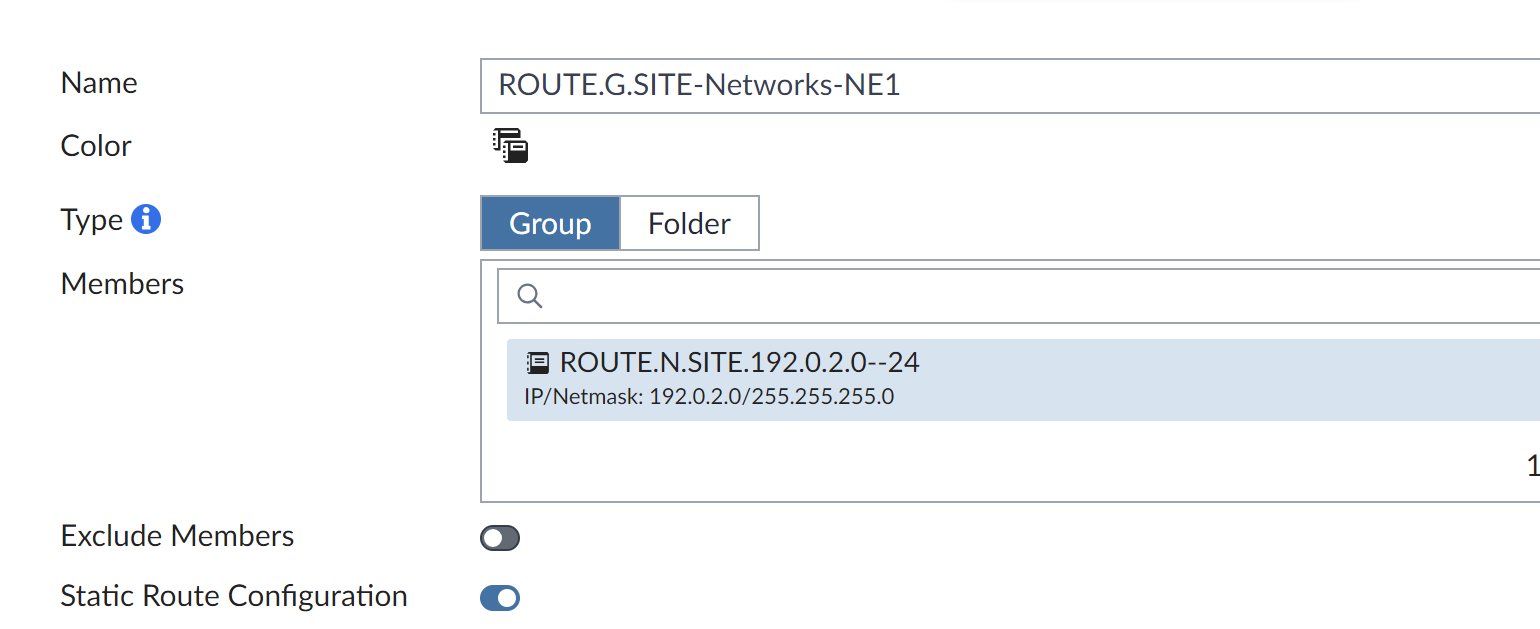
Groups Object
# show firewall addrgrp ROUTE.G.SITE-Networks-NE1
config firewall addrgrp
    edit "ROUTE.G.SITE-Networks-NE1"
        set allow-routing enable
        set member "ROUTE.N.SITE.192.0.2.0--24"
    next
end
Static Route
# show router static
config router static
    edit 1
        set gateway 198.51.100.1
        set device "port1"
        set dstaddr "ROUTE.G.SITE-Networks-NE1"
    next
end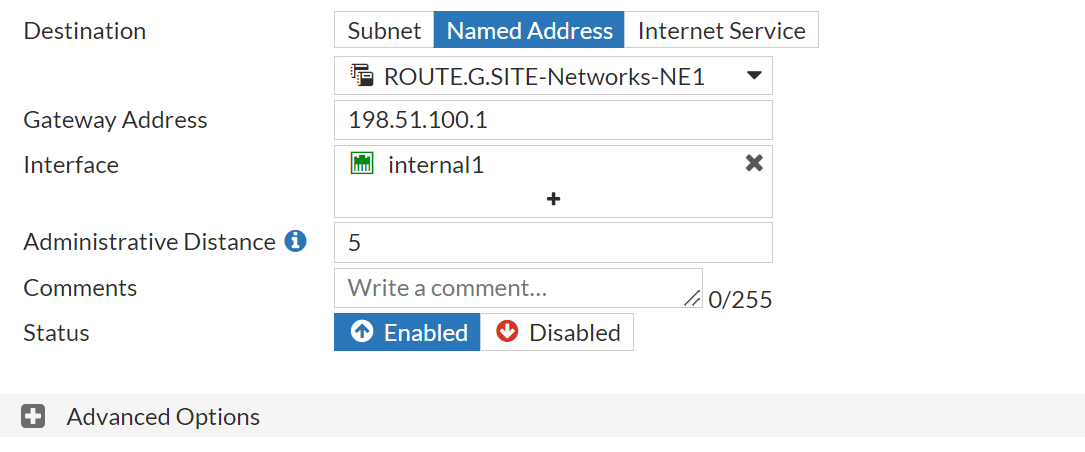
FortiManager
Address
Group
Routing


VPN Manager

Conclusion
This comes in handy when using the VPN Manager and the Fortigates are not always the First HOP.
With version 6.4.x i see at least the the the first deployment works with out issues. A least with groups changes later one will not be pushed, when those groups are not part of the policy package.
Links
- Configuration
- Max Values
- RFC Networks for Documentation
